Create flashcards for Anki
The following instructions assume that you have AnkiMobile installed. If not you can get it directly from the App Store, a paid app but worth the 💰.
I’ve had it on my iPhone for a long time without ever using it properly, mostly because card creation is a tedious manual process. This changed when a version with automatic content creation through a custom URL scheme was released.
It fits nicely with the concept of motî as a “lexicographic provider“ – there is no reason to reimplement spaced repetition when there are already so many good tools available.
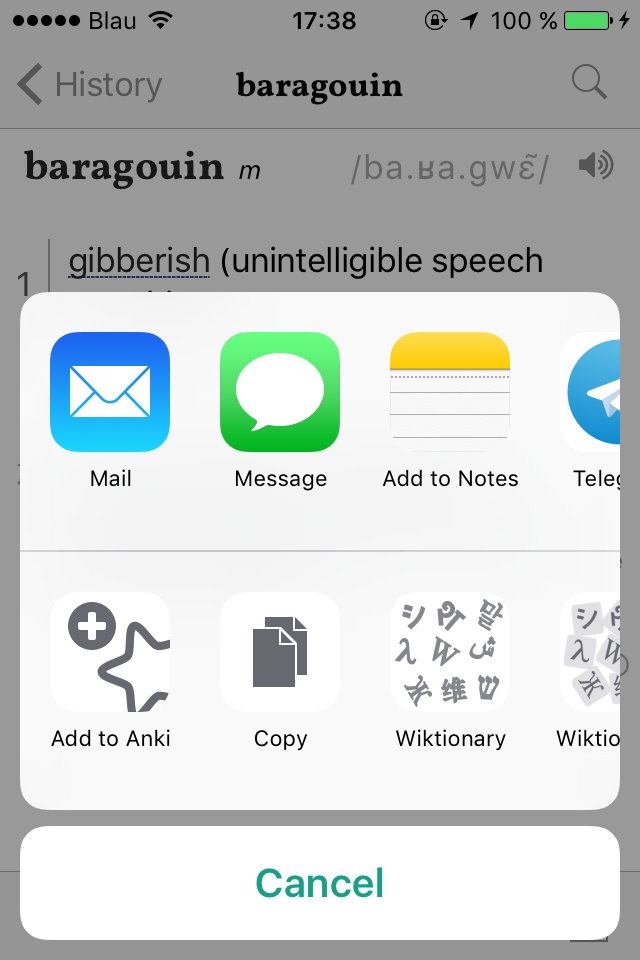
«C’est quoi ce baragouin?»
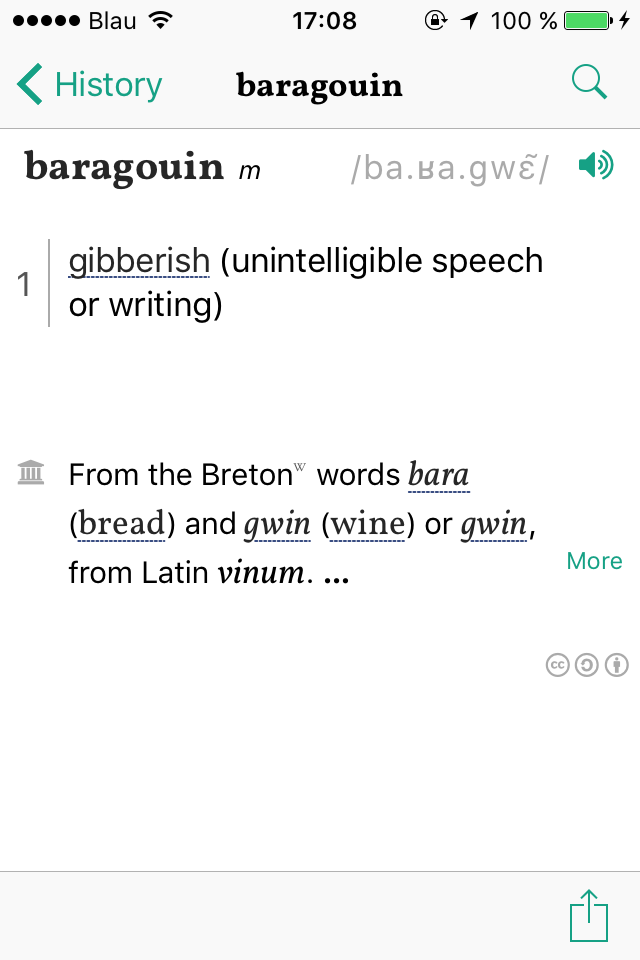
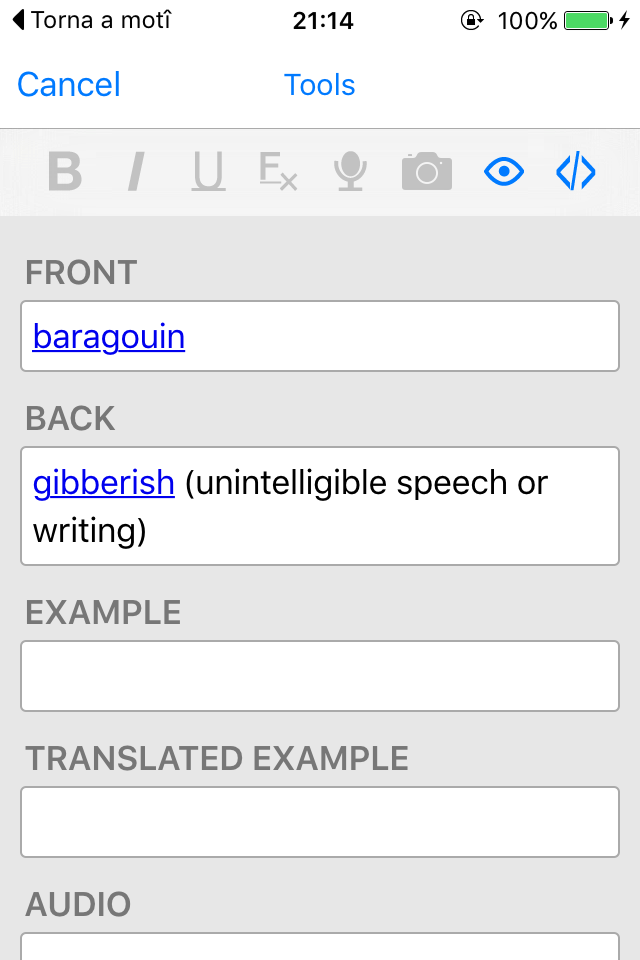
This document will walk through the necessary steps to create a flashcard for the French word baragouin (or “gibberish”).
Here it is:
Setting up

The first step is to tell motî your Anki configuration. Open the share menu from the toolbar and select “Configure Anki”.
Basic settings
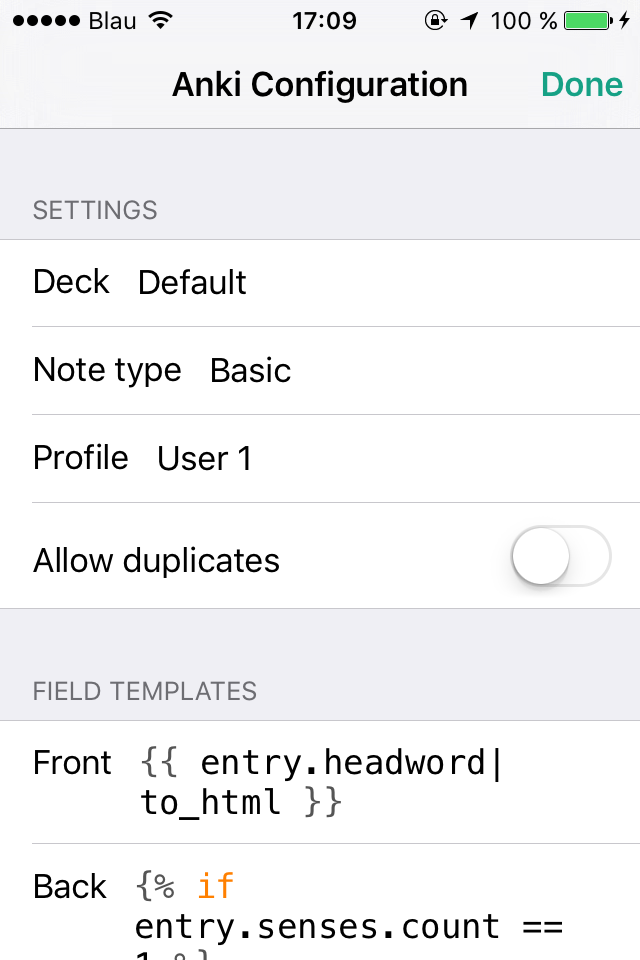
The basic settings are deck name, note type and profile.
The deck name Default has a special significance in Anki:
it is always present but only visible if it contains cards. Leave
this setting to Default unless you already have a specific deck
where you want your cards to go.
The note type describes the fields used to create the flashcards. Right now
only the Basic note type is supported. It contains two fields, one for the
card’s front side (“question”) and one for the the back (“answer”).
Profile is set to User 1 which is also Anki’s default setting.
You only need to change it if you use a different profile.
Allow duplicates tells Anki to skip the duplicate check. It should
normally be left disabled.
Field Templates
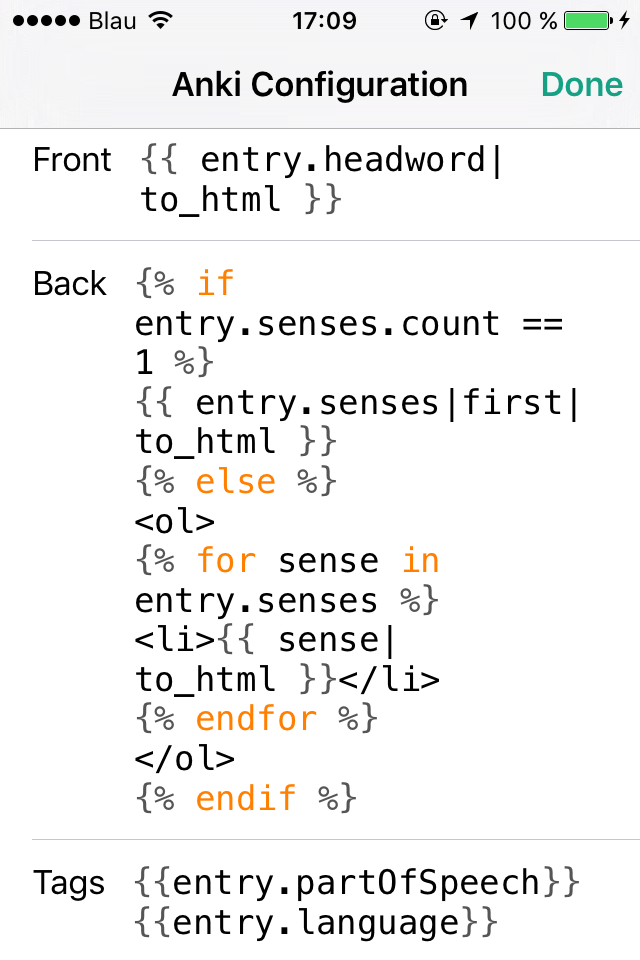
The next section contains templates which transform the lexicographic entry data into HTML code used by Anki to display the cards.
There is one template for the front side of the card, one for the back side, and one for tags. Tags are labels attached to notes in Anki, to make organizing and finding them easier. For example, you could use tags to only review French verbs.
Leave the default settings unless you want to customize the output. The template language syntax is documented separately.
Preview
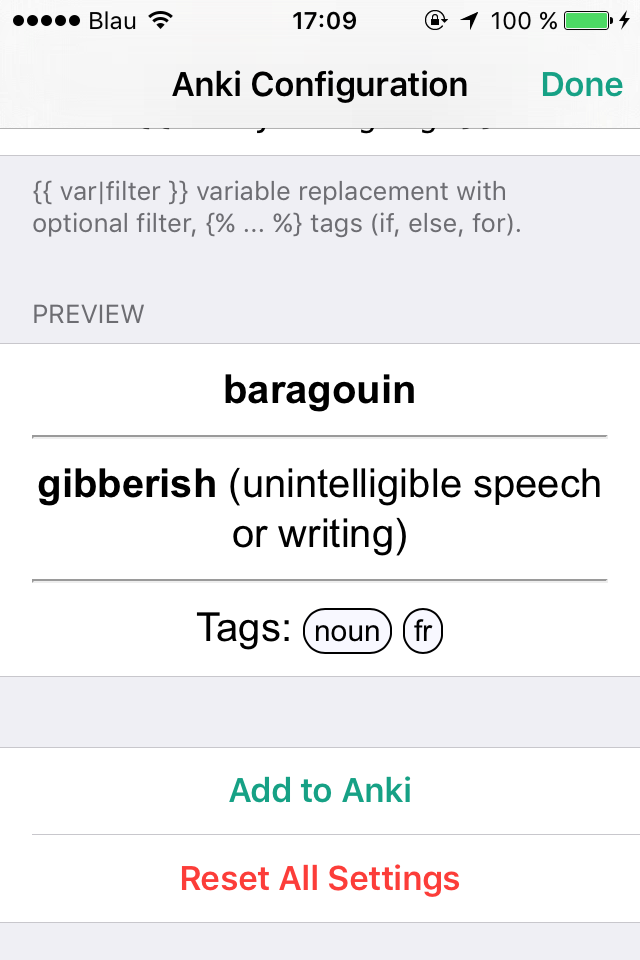
The lower part of the configuration screen shows how the card will appear in Anki (or rather an approximation, since it does not have access to the actual stylesheet). The front side contains the French word “baragouin”, the back side the English translation.
The last row displays the tags associated with the entry, here noun (the
part of speech) and fr (the language code for French).
Once you’re happy with these settings select “Add to Anki”.
Over to Anki
AnkiMobile will open automatically, add your note to the specified deck and then hand control back to motî. In case of a duplicate entry (or any other problem) an error alert will pop up instead.
Go back to Anki and look for the newly created note in the deck browser. Tags, front and back fields should have been automatically populated, including links to quickly look up words during card review.
Preview
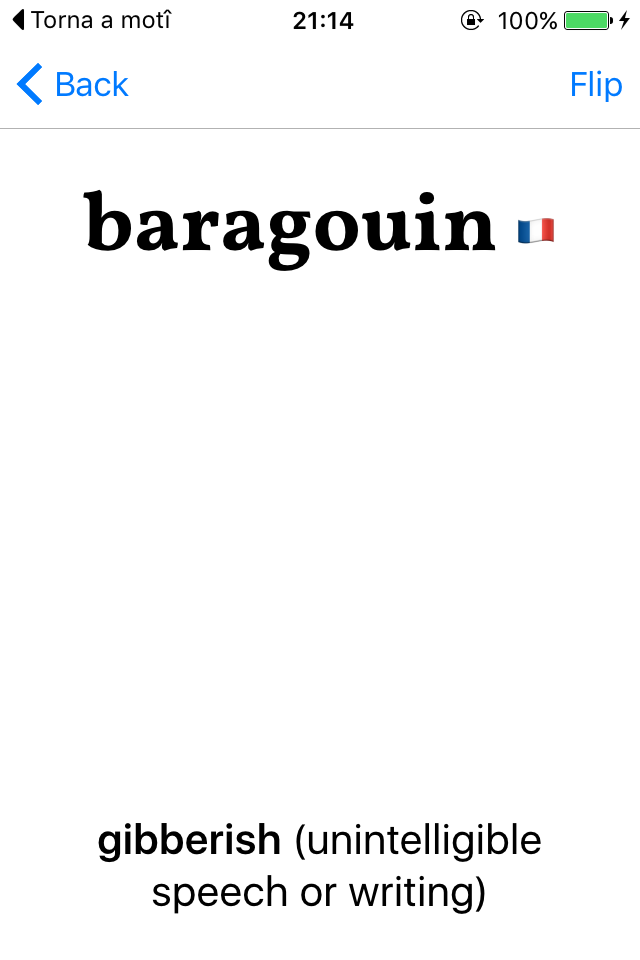
Anki’s preview mode shows how the card will look when reviewed. You’ll notice the little flag (🇨🇵) next to the French word. I use the default deck to store cards for all the languages I’m learning so this extra bit of context is helpful (and sometimes necessary). It can be activated by adding the following snippet to Anki’s CSS:
a:lang(fr)::after {
  content: " 🇨🇵";
  /*  alternatively, w/ unicode escapes */
  content: " \01f1eb\01f1f7";
}
The flags are rendered with a unicode feature called Regional Indicator Symbols, you should be able to find one for most languages (except Latin and Esperanto). It is of course possible to just insert text instead: flags are not languages, after all. I like them because they are easy to scan and add a touch of color to the otherwise bland cards.
The next card
Now that everything is set up and working you can take a shortcut the next time and pick “Add to Anki” from the share menu. It will directly add the current entry with the previously used settings.
Batch exporting
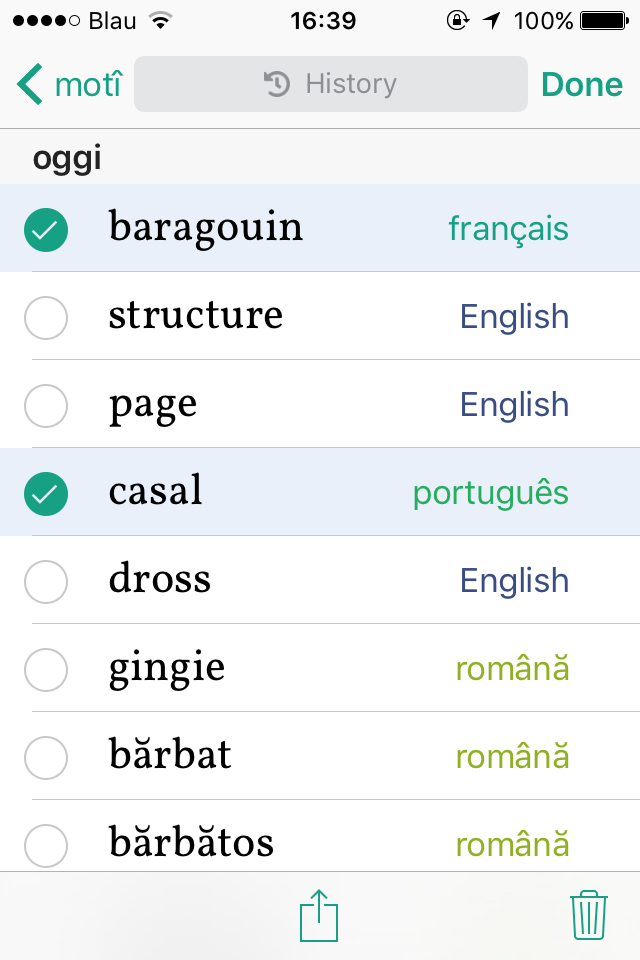
If you want to export multiple entries at the same time you can do so from the history screen.
This concludes the walkthrough of the Anki integration, the remainder of this document explains the technical details of the template language in case you want to tweak the default settings 🔧.
The template language syntax in detail
The template language used to create the fields and tags is called Stencil. The syntax is close to Django or Mustache, so if you’re already familiar with either you won’t have to learn much.
In any case it is a fairly simple language. The following is a list of the main language elements used in the default template configuration:
| Element | Description |
|---|---|
{{ ... }} |
Print variables to template output |
{{ ...|filter }} |
Run variable through a filter (chainable) |
{% if %}, {% else %}, {% endif %} |
Conditionally include content |
{% for item in list %}, {% endfor %} |
Loop over a list of elements |
Front side template
The default template for the front side of a card is just one line:
{{ entry.headword|to_html }}
It takes the entry headword and converts it to HTML using the built-in
to_html filter. To get plain text simply remove the filter:
{{ entry.headword }}.
Back side template
This one is a bit heavier:
{% if entry.senses.count == 1 %}
    {{ entry.senses|first|to_html }}
{% else %}
    <ol>
    {% for sense in entry.senses %}
        <li>{{ sense|to_html }}</li>
    {% endfor %}
    </ol>
{% endif %}
It first checks how many senses the entry has – if it’s just one
(entry.senses.count == 1) it outputs it directly. Otherwise ({% else %})
it starts an ordered list <ol> and loops over all the senses, wrapping each
one in a <li> list item.
Tags
Tags in Anki are specified as space-separated strings.
{{entry.partOfSpeech}} {{entry.language}}
This template simply outputs the part of speech identifier (noun) followed
by the language code of the entry (fr).
Built-in filters
| Filter | Function | Example |
|---|---|---|
| first | returns first element of a list | {{ entry.senses|first }} |
| to_html | converts to HTML | {{ sense|to_html }} |
| capitalize | test → Test | {{ "test"|capitalize }} |
| uppercase | test → TEST | {{ "test"|uppercase }} |
| lowercase | Test → test | {{ "Test"|lowercase }} |
| join | join a list of items | {{ value|join:", " }} |
| default | use given default if a variable not present in the context | {{ name|default:"World" }} |
Also see the list of built-in filters in Stencil.
Supported variables
⚠ Only a subset of the stored lexicographic data is currently accessible from the templates.
| Variable | Example output |
|---|---|
{{ entry.headword }} |
baragouin |
{{ entry.partOfSpeech }} |
noun |
{{ entry.language }} |
fr |
{{ entry.language.nativeName }} |
français |